Creating Web Application using Maven in IntelliJ
This tutorial will teach you on creating web application using maven in IntelliJ. This assumes that you have maven installed in your local machine. If not, check this tutorial of installing maven on windows.
1. Start by creating a new project in IntelliJ
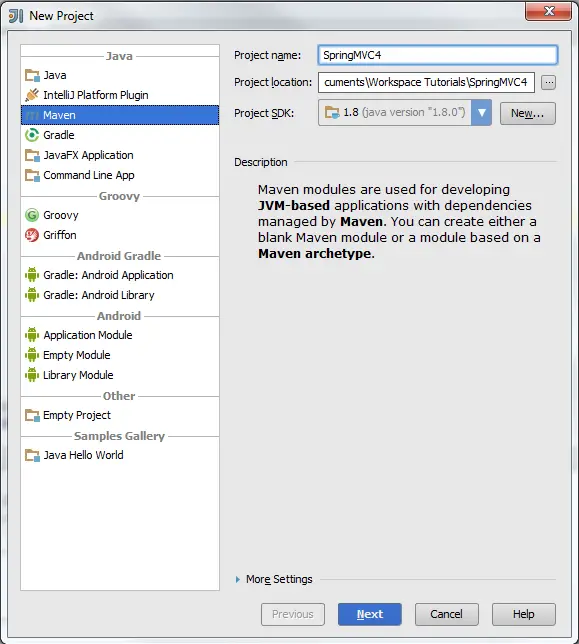
Under new project, on the left side, click Maven. Add your project name and the location of the project to be save. Choose your JDK version, in our case, we use Java 8. You should see something similar below,
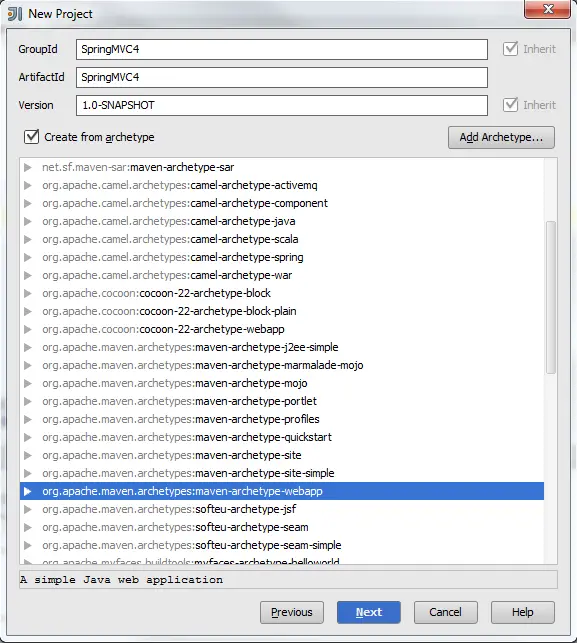
Click Next. The GroupId and ArtifactId will be filled by default
values based on the project name. Tick in Create from arechetype, and
choose org.apache.maven.archetypes:maven-archetype-webapp. Click Next to continue creating the project.
After creating the project, you should see your project structure to something similar below,
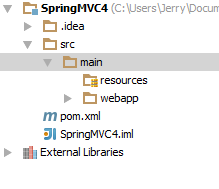
By default, when creating a webapp project in maven, it doesn’t include the java folder for the source code. For the sake of simplicity, we will just add a new folder under the main folder named java.
2. Configure pom.xml
Above dependencies section, add properties section containing the jdk.version definition:
|
1
2
3
|
<properties>
<jdk.version>1.8</jdk.version>
</properties>
|
Under build section, add the maven compiler plugin and jetty plugin. Jetty plugin will be the web app container just like tomcat, jboss, glassfish, etc.
|
1
2
3
4
5
6
7
8
9
10
11
12
13
14
15
16
17
18
19
20
21
22
23
24
25
26
27
|
<plugins>
<plugin>
<groupId>org.apache.maven.plugins</groupId>
<artifactId>maven-compiler-plugin</artifactId>
<version>3.0</version>
<configuration>
<source>${jdk.version}</source>
<target>${jdk.version}</target>
</configuration>
</plugin>
<plugin>
<groupId>org.mortbay.jetty</groupId>
<artifactId>maven-jetty-plugin</artifactId>
<version>6.1.10</version>
<configuration>
<scanIntervalSeconds>10</scanIntervalSeconds>
<connectors>
<connector implementation="org.mortbay.jetty.nio.SelectChannelConnector">
<port>8080</port>
<maxIdleTime>60000</maxIdleTime>
</connector>
</connectors>
<stopKey>STOP</stopKey>
<stopPort>8005</stopPort>
</configuration>
</plugin>
</plugins>
|
The final pom.xml should be something similar to this
|
1
2
3
4
5
6
7
8
9
10
11
12
13
14
15
16
17
18
19
20
21
22
23
24
25
26
27
28
29
30
31
32
33
34
35
36
37
38
39
40
41
42
43
44
45
46
47
48
49
50
51
52
53
54
|
<project xmlns="http://maven.apache.org/POM/4.0.0" xmlns:xsi="http://www.w3.org/2001/XMLSchema-instance"
<modelVersion>4.0.0</modelVersion>
<groupId>SpringMVC4</groupId>
<artifactId>SpringMVC4</artifactId>
<packaging>war</packaging>
<version>1.0-SNAPSHOT</version>
<name>SpringMVC4 Maven Webapp</name>
<properties>
<jdk.version>1.8</jdk.version>
</properties>
<dependencies>
<dependency>
<groupId>junit</groupId>
<artifactId>junit</artifactId>
<version>3.8.1</version>
<scope>test</scope>
</dependency>
</dependencies>
<build>
<finalName>SpringMVC4</finalName>
<plugins>
<plugin>
<groupId>org.apache.maven.plugins</groupId>
<artifactId>maven-compiler-plugin</artifactId>
<version>3.0</version>
<configuration>
<source>${jdk.version}</source>
<target>${jdk.version}</target>
</configuration>
</plugin>
<plugin>
<groupId>org.mortbay.jetty</groupId>
<artifactId>maven-jetty-plugin</artifactId>
<version>6.1.10</version>
<configuration>
<scanIntervalSeconds>10</scanIntervalSeconds>
<connectors>
<connector implementation="org.mortbay.jetty.nio.SelectChannelConnector">
<port>8080</port>
<maxIdleTime>60000</maxIdleTime>
</connector>
</connectors>
<stopKey>STOP</stopKey>
<stopPort>8005</stopPort>
</configuration>
</plugin>
</plugins>
</build>
</project>
|
3.Deploying/Running the Project
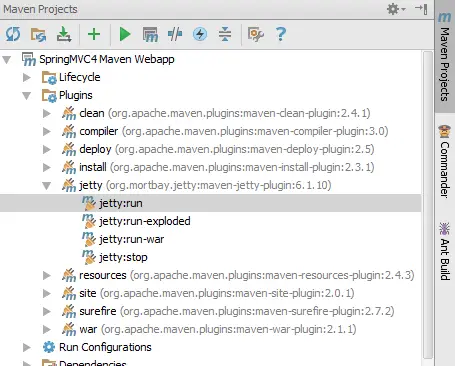
On the right side, open Maven Projects. In case this tab is not
visible, you can open this by click the square located at the lower left
corner ![]() .
Under Maven Projects, open your webapp project, click plugins and
double click jetty:run. To debug, right click jetty:run and click debug
project. This will deploy your project.
.
Under Maven Projects, open your webapp project, click plugins and
double click jetty:run. To debug, right click jetty:run and click debug
project. This will deploy your project.
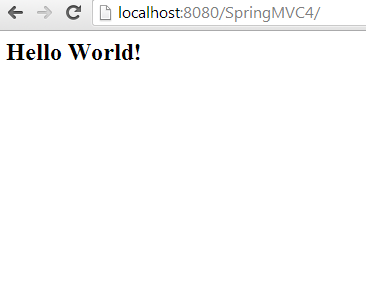
In the console you can see the status of your deployment. Once you see something like Started SelectChannelConnector@0.0.0.0:8080, you can now browse the web at address localhost:8080/ProjectName and you should see the default jsp page.
You can download the source code here.

سلام لینکت رو گذاشتم ، لینک من رو هم بزار، دنبال کردن رو هم فعال کن .
سایت :http://parsizmusic.blog.ir
نویسنده :The Wolf