نکات کاربردی

طبقه بندی موضوعی

آخرین مطالب

۳ مطلب در آبان ۱۳۹۵ ثبت شده است

1-Setting Up a Local Git Repository

create a local Git repository

  1. Open the project you want to store in a repository.
  2. On the main menu, choose VCS | Import into Version Control | Create Git Repository.
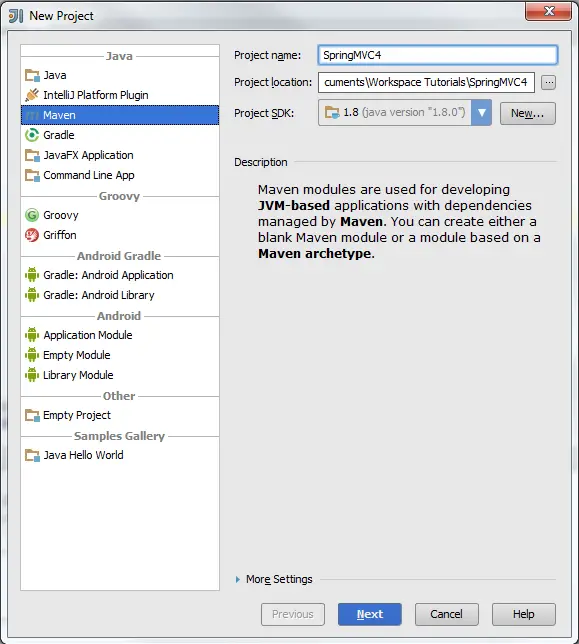
  3. In the dialog that opens, specify the directory where you want to create a new Git repository.
  4. Put the required files under Git version control. The files appear in the Local Changes tab of the Version Control tool window, under the Default changelist


2-Adding Files to a Local Git Repository

View | Tool Windows | Version Control - Local Changes
Alt+9

Basics

After a Git repository for a project is initialized, you need to add the project data to it.


Adding all currently unversioned files to Git control

  1. Switch to the Version Control tool window and switch to the Local Changes tab. tool window.
  2. Expand the Unversioned Files node and choose Add to VCS from the context menu or pressCtrl+Alt+A.

Adding specific files to a local Git repository

Do one of the following:

  • Switch to the Version Control tool window and switch to the Local Changes tab. Expand the Unversioned Files node, and select the files to be added. From the context menu, chooseAdd to VCS, or press Ctrl+Alt+A.
  • Switch to the Project tool window and select the files to be added. From the context menu, choose Git | Add or pressCtrl+Alt+A.


***

Adding Files to Version Control

If a new file is created with IntelliJ IDEA in a directory that is already under version control, it automatically adds to the active changelist with the status Added. All you have to do, is to commit this change.

IntelliJ IDEA's behavior on adding files is configurable in the General Settings tab of the Version Control dialog.

If a new file is created outside of IntelliJ IDEA, or silent adding is disabled, you have to explicitly add it to the version control.

Another approach is VCS-specific. You can import an entire directory to your repository, provided that you have the corresponding access rights. This action is helpful for putting a whole project under version control.

To explicitly add a file to version control

  1. Select file in the Project tool window.
  2. On the main Version Control menu or on the context menu of the selected file, choose <VCS> | Add.

    Alternatively, use the Version Control tool window. Select the desired files in the Unversioned files changelist in the Local Changes tab, and choose Add to VCS on the context menu, or just drag it to the target changelist.

    img
  3. Select the added file in the changelist and check in (commit) changes.

behrad nasehi
۰۵ آبان ۹۵ ، ۲۰:۰۵ موافقین ۰ مخالفین ۰ ۰ نظر

This tutorial will teach you on creating web application using maven in IntelliJ. This assumes that you have maven installed in your local machine. If not, check this tutorial of installing maven on windows.

1. Start by creating a new project in IntelliJ

Under new project, on the left side, click Maven. Add your project name and the location of the project to be save. Choose your JDK version, in our case, we use Java 8. You should see something similar below,

new project

Click Next. The GroupId and ArtifactId will be filled by default values based on the project name. Tick in Create from arechetype, and choose org.apache.maven.archetypes:maven-archetype-webapp. Click Next to continue creating the project.
new project 2

After creating the project, you should see your project structure to something similar below,

project structure

By default, when creating a webapp project in maven, it doesn’t include the java folder for the source code. For the sake of simplicity, we will just add a new folder under the main folder named java.

2. Configure pom.xml

Above dependencies section, add properties section containing the jdk.version definition:


1
2
3
<properties>
    <jdk.version>1.8</jdk.version>
</properties>

Under build section, add the maven compiler plugin and jetty plugin. Jetty plugin will be the web app container just like tomcat, jboss, glassfish, etc.

1
2
3
4
5
6
7
8
9
10
11
12
13
14
15
16
17
18
19
20
21
22
23
24
25
26
27
<plugins>
    <plugin>
        <groupId>org.apache.maven.plugins</groupId>
        <artifactId>maven-compiler-plugin</artifactId>
        <version>3.0</version>
        <configuration>
            <source>${jdk.version}</source>
            <target>${jdk.version}</target>
        </configuration>
    </plugin>
    <plugin>
        <groupId>org.mortbay.jetty</groupId>
        <artifactId>maven-jetty-plugin</artifactId>
        <version>6.1.10</version>
        <configuration>
            <scanIntervalSeconds>10</scanIntervalSeconds>
            <connectors>
                <connector implementation="org.mortbay.jetty.nio.SelectChannelConnector">
                    <port>8080</port>
                    <maxIdleTime>60000</maxIdleTime>
                </connector>
            </connectors>
            <stopKey>STOP</stopKey>
            <stopPort>8005</stopPort>
        </configuration>
    </plugin>
</plugins>

The final pom.xml should be something similar to this

1
2
3
4
5
6
7
8
9
10
11
12
13
14
15
16
17
18
19
20
21
22
23
24
25
26
27
28
29
30
31
32
33
34
35
36
37
38
39
40
41
42
43
44
45
46
47
48
49
50
51
52
53
54
 
    <modelVersion>4.0.0</modelVersion>
    <groupId>SpringMVC4</groupId>
    <artifactId>SpringMVC4</artifactId>
    <packaging>war</packaging>
    <version>1.0-SNAPSHOT</version>
    <name>SpringMVC4 Maven Webapp</name>
    <url>http://maven.apache.org</url>
 
    <properties>
        <jdk.version>1.8</jdk.version>
    </properties>
    <dependencies>
        <dependency>
            <groupId>junit</groupId>
            <artifactId>junit</artifactId>
            <version>3.8.1</version>
            <scope>test</scope>
        </dependency>
 
    </dependencies>
    <build>
        <finalName>SpringMVC4</finalName>
        <plugins>
            <plugin>
                <groupId>org.apache.maven.plugins</groupId>
                <artifactId>maven-compiler-plugin</artifactId>
                <version>3.0</version>
                <configuration>
                    <source>${jdk.version}</source>
                    <target>${jdk.version}</target>
                </configuration>
            </plugin>
            <plugin>
                <groupId>org.mortbay.jetty</groupId>
                <artifactId>maven-jetty-plugin</artifactId>
                <version>6.1.10</version>
                <configuration>
                    <scanIntervalSeconds>10</scanIntervalSeconds>
                    <connectors>
                        <connector implementation="org.mortbay.jetty.nio.SelectChannelConnector">
                            <port>8080</port>
                            <maxIdleTime>60000</maxIdleTime>
                        </connector>
                    </connectors>
                    <stopKey>STOP</stopKey>
                    <stopPort>8005</stopPort>
                </configuration>
            </plugin>
        </plugins>
    </build>
</project>

3.Deploying/Running the Project

On the right side, open Maven Projects. In case this tab is not visible, you can open this by click the square located at the lower left corner a. Under Maven Projects, open your webapp project, click plugins and double click jetty:run. To debug, right click jetty:run and click debug project. This will deploy your project.

maven jetty

In the console you can see the status of your deployment. Once you see something like Started SelectChannelConnector@0.0.0.0:8080, you can now browse the web at address localhost:8080/ProjectName and you should see the default jsp page.

hello world maven
You can download the source code here.

مرجع

behrad nasehi
۰۵ آبان ۹۵ ، ۱۸:۵۶ موافقین ۰ مخالفین ۰ ۱ نظر
behrad nasehi
۰۳ آبان ۹۵ ، ۲۲:۱۱ موافقین ۰ مخالفین ۰ ۰ نظر